Interested in learning how to dehydrate cheese at home? Well, you’re in for a treat! Dehydrating cheese isn’t just doable from your kitchen, it’s also fun and rewarding. Leftover cheese, extra cheese, homemade cheese, or even store-bought cheese, all can be dehydrated to unlock a realm of culinary possibilities. Picture yourself making cheese bread, cheese sauces, homemade trail mix, and creating your very own dehydrated cheese powder. Excited? Let’s dive in!
Hard cheese (Parmesan, Romano, Asiago, sharp cheddar)
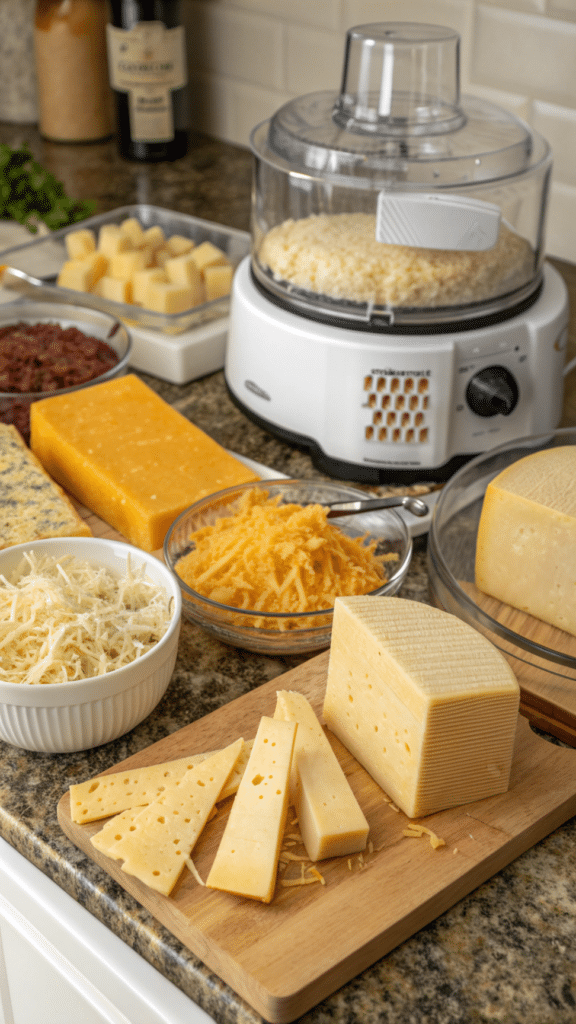
Equipment
Food dehydrator, dehydrator trays, parchment paper, cheese grater or food processor, paper towels, airtight container or vacuum-sealable bags
1. Prep Cheese
Grate or shred cheese into small pieces (¼ inch or smaller). Pat dry with paper towels to remove excess moisture.
2. Arrange Cheese
Spread cheese in a single layer on parchment-lined dehydrator trays without overlapping.
3. Set Temperature
Set dehydrator to 125°F – 135°F (52°C – 57°C).
4. Dehydrate
Dry cheese for 6 to 10 hours until brittle and snaps easily. Check periodically.
5. Manage Grease
Dab any grease on cheese surface with paper towels.
6. Cool Cheese
Let dried cheese cool completely before storing.
7. Optional
Grind dried cheese into powder using food processor or coffee grinder.
8. Store
Store cheese or cheese powder in airtight containers or vacuum-sealed bags in a cool, dark place.
Choosing the Right Cheese for Dehydration
When it comes to dehydrating cheese at home, your first step is choosing the right cheese. Have you ever wondered why some cheeses are better for this than others? The answer lies in the fat content. Cheese with a high-fat content, like brie or cheddar, isn’t the best option for dehydration. Why? The excessive oil might cause them to go rancid. The best cheeses for dehydrating are hard, low-moisture varieties such as Parmesan, Romano, Asiago, and sharp cheddar. Hard, low-moisture cheeses become brittle and crisp when dehydrated, while softer cheeses retain too much moisture. Parmesan, Romano, Asiago, sharp cheddar, and Colby are among the best cheeses for dehydration, while Brie, cream cheese, and mozzarella should be avoided due to their high fat and moisture content. Harder, aged cheeses like Cheddar, Parmesan, Gouda, or Asiago are best for dehydration due to their lower moisture content.
To prep your cheese for dehydration, it’s ideal to grate it first. Grating cheese ensures even dehydration and helps achieve the desired texture. Once dehydrated, the cheese should appear slightly brown and brittle.
Equipment Needed
Before you dive into the world of dehydrated cheese, it’s important to gather the right equipment to make the process smooth and successful. The star of the show is, of course, a dehydrator. Whether you opt for a stackable tray dehydrator or a shelf-style model, this appliance ensures your cheese dries evenly and efficiently.
To keep your cheese from sticking and to make cleanup a breeze, line your dehydrator trays with parchment paper or specialized dehydrator sheets. These create a non-stick surface and help catch any oil that might be released during the drying process. Don’t forget to have plenty of paper towels on hand—patting your cheese dry before you start will help remove excess moisture and speed up the drying process.
A food processor or cheese grater is also a must-have for prepping your cheese. Shredding or grating your cheese increases the surface area, allowing it to dehydrate more quickly and evenly. Once your cheese is perfectly dried, you’ll want airtight containers or vacuum-sealable bags for storage. These keep out moisture and air, preserving the flavor and texture of your dehydrated cheese for the long haul.
With these simple tools—dehydrator, parchment paper, paper towels, food processor, and proper storage containers—you’ll be ready to dehydrate cheese like a pro and enjoy delicious, shelf-stable cheese whenever you want.
Prepping Your Cheese for the Dehydration Process
Alright, you’ve chosen your favorite cheese and you’re eager to get started. What’s next? Prep time! Transforming your fresh cheese into dehydrated cheese is a straightforward process, but like all great achievements, it requires a bit of prep work. Don’t worry, we’re here to guide you through.
Firstly, let’s make sure your cheese is ready to go. Although you can dehydrate cheese in any form or condition, shredding or grating it will help speed up the drying process dramatically. To ensure even drying, cheese should be shredded or cut into small, uniform pieces, ideally ¼ inch thick or smaller. Cheese should be cut into small pieces and patted dry with paper towels before dehydrating to remove excess moisture. The best results for dehydrating cheese come from using grated cheese. Got a lot of leftover cheese from that gourmet pizza last night? Maybe some extra cheese you bought in a fit of dairy-fueled enthusiasm? Go ahead and shred it up using your food processor or manual grater. Shredded cheese maximizes the surface area that’s exposed, meaning it will dry more quickly and evenly. If you’re using already grated cheese or homemade cheese, that’s perfect too!
During the dehydration process, dried cheese can develop grease on its surface, which can be absorbed by patting it with paper towels. If the cheese appears very greasy during the process, simply dab it with paper towels to manage the grease.
White cheddar, mozzarella cheese, mild cheddar, you name it! Any kind of cheese can be used for dehydration. However, consider that cheeses with a high-fat content can be prone to going rancid after drying. So, if you’re planning for long-term storage, you might want to stick with cheeses like firm cheddar cheese and avoid soft and fresher cheeses.
Prepping Your Dehydrator: Arrange your dehydrator trays and make sure they’re clean and ready for action. Dehydrators with adjustable temperature control are ideal for dehydrating cheese, as they allow you to set the precise temperature needed. If you’re working with higher-fat cheeses, consider using trays to help catch any oil that may render out during the drying process.
Dehydrating the Cheese: Place your dehydrator tray filled with cheese in the dehydrator. The dehydrating cheese process can take 6 to 10 hours for cheese to dry completely in a dehydrator, depending on the type of dehydrator and moisture content in the cheese. Be patient and wait, checking periodically for progress. Reminder: use low heat for best results.
Setting the Temperature: Maintaining a low heat during the drying process is crucial in preserving the taste and nutritional value of the cheese. Set your food dehydrator temperature between 125°F and 135°F to prevent melting and cooking the cheese. Remember, we are attempting to gently remove the excess water from our cheese, not cook it!
Checking for Doneness: Check the cheese periodically to see if it has become completely dry. Wait patiently and check every hour or so. Properly dried cheese should snap easily and have a brittle texture. The cheese may become slightly brown and brittle, and sometimes pieces may get stuck together, but they can be broken apart easily. If the cheese is still pliable or mushy, continue drying. If you notice any mold or if the cheese smells rancid after dehydration, discard it immediately.
Cooling the Cheese: After the cheese has completely dried, let it cool. It’s important to allow your dehydrated cheese to cool before moving on to the next step.
Grinding to Powder: For dehydrated cheese powder, simply toss your dried cheese into a food processor or coffee grinder and pulse until it reaches your desired texture. Sometimes the powder may get stuck or clump together, but it can be broken apart easily for use. Cheese powder is fantastic for making homemade cheese sauces, cheese bread, and much more!
Storing Dried Cheese: Once you have a whole batch of homemade dehydrated cheese or even dehydrated cheese powder, store it in an airtight container or glass jar to keep excess air and moisture out. These two elements are the biggest foes to your cheesy goodness keeping its flavor and texture. Freeze-drying could potentially extend the shelf life even further. Vacuum-sealed bags are another excellent long-term storage option. Dehydrated cheese takes up less volume than fresh cheese, occupying about 1/6th of its original storage space, making it lightweight, compact, and easier to store or use in recipes. Note that home-dehydrated cheese may have a shorter shelf life compared to commercial variants and often needs refrigeration for long-term safety. If mold appears on dehydrated cheese, or if it smells rancid, it should be discarded.
Dehydrated cheese can be rehydrated by soaking in warm water for about 15 minutes or added directly to soups and sauces. Also, dehydrated cheese preserves its structure when baked and takes up less volume, making it convenient for cooking and storage.
Warning: Home-dehydrated cheese is likely to cause food poisoning due to improper processing. Always follow safe food handling practices and consider the risks before consuming.
And, Voila! You have your very own homemade, shelf-stable cheese ready for use when you need it.
Using a Dehydrator vs. Alternative Methods
What’s that? You don’t have a dehydrator at home? Don’t worry! Although using a dehydrator is the most straightforward method, alternative methods exist that can help you dehydrate cheese right from the comfort of your home.
Alternative methods to dehydrate cheese can include the use of an oven on a low heat setting. Oven drying is an easy way to dehydrate cheese at home, and making baked or oven-dried cheese by baking it at low temperatures is another easy way to preserve and concentrate the flavor of cheese. Although it’s not the optimal method, it can be done if you don’t own a dehydrator. Be careful to regularly check the cheese to avoid over-drying.
In case of using an oven, place the shredded cheese on a baking tray, ensuring it’s spread out in a single layer. The time estimation for this method can vary, and you might need to periodically turn and move the cheese to help it dry uniformly.
Another unconventional method is to freeze dry cheese. Freeze-drying cheese is a safe and easy process compared to dehydrating it, and it is recommended to use a home freeze-dryer for safely drying cheese instead of a home dehydrator. If you’re lucky enough to have a freeze dryer, this can be a neat way to extend the shelf life of your cheese. Simply put your grated cheese in a freeze dryer, then let the device remove the extra moisture. Be aware of high-fat content cheeses as they might pose a challenge while freeze drying.
Note: Commercially dried cheese products are processed quickly at high temperatures to ensure safety.
Freeze Dry Cheese
If you’re looking for a way to preserve cheese that locks in flavor, texture, and nutrition, freeze-drying is a fantastic option. You can freeze dry cheese using a dedicated freeze dryer, which works by first freezing the cheese at extremely low temperatures. Then, under reduced pressure, the frozen water in the cheese sublimates—meaning it turns directly from ice to vapor, skipping the liquid stage entirely. This unique process results in dried cheese that’s light, crisp, and packed with flavor.
Freeze drying is especially handy for high-fat cheeses like cheddar and parmesan, which can be tricky to dehydrate using traditional methods. The low temperature and gentle process help prevent the growth of mold and bacteria, so your freeze dried cheese stays safe and delicious for months or even years. Plus, freeze dried cheese retains much of its original texture and can be easily rehydrated when you’re ready to use it in your favorite recipes.
Whether you want to stock up on long-lasting snacks, add a gourmet touch to your camping meals, or simply enjoy the convenience of shelf-stable cheese, freeze dry cheese is a smart and tasty solution.
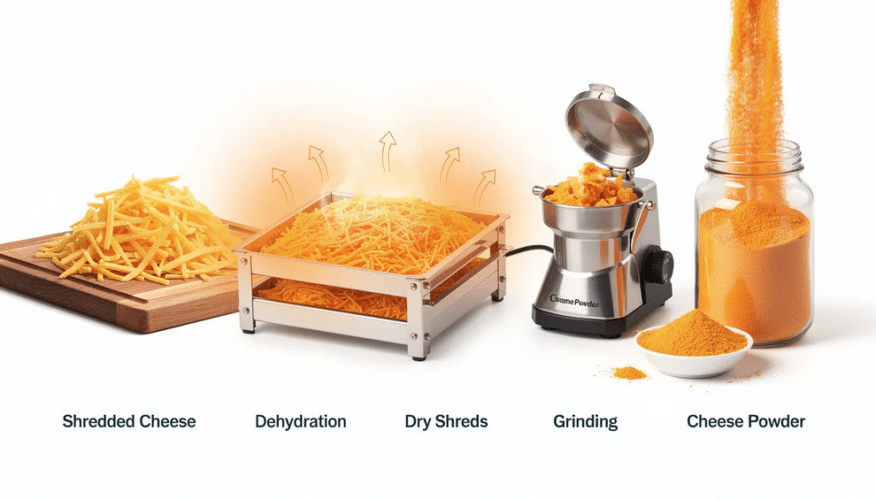
Transforming Shredded Cheese into Dehydrated Cheese Powder
Exciting news, cheese lovers! Not only can you dehydrate cheese, but your dehydrated cheese can be transformed into dehydrated cheese powder! This nutrient-rich powder can jazz up your cheese bread, white sauce, or popcorn. It can even work as a delightful addition to your store-bought dog food. You can also use it as an exciting ingredient in making your homemade cheese sauce. Who’s ready to add a new flavor to their culinary adventures?
Firstly, let’s gather all the equipment you will need. Make sure you have your food processor or a good old coffee grinder at the ready, clean, and in good working order. If you don’t have either you can also use a mortar and pestle if you’d like to add a dash of old-world charm to the process. You will also need an airtight container or a vacuum seal bag for storage.
Now, let’s get started. You need to take your home dehydrated cheese that’s well-rested and cool. It could be your favorite cheddar, mozzarella cheese, or any other cheese that you’ve transformed using our step-by-step guide on how to dehydrate cheese. Now, let me show you how you can convert it into a tasty cheese powder.
Break the dried cheese: After being sure your cheese is completely dry, you need to break your dehydrated cheese into chunks small enough to fit into your food processor or coffee grinder.
Grind the cheese: Place the chunks of cheese in your food processor or coffee grinder and pulse until they turn into a fine powder.
Store the cheese powder: Eager to taste? Hold on a bit! You need to store your freshly ground cheese powder in an airtight container or vacuum-sealed bag. Remember, the aim is to maintain its freshness for long-term usage, so it is best to resist dipping into it straight away! For added convenience and cost-effectiveness, consider storing your cheese powder in bulk, which makes it easier to have plenty on hand for recipes.
Dehydrated cheese also takes up less volume, which is especially important when kneading dough or mixing it into recipes, allowing for easier handling and more efficient storage.
Your homemade powdered cheese is ready to sprinkle over any dish for an added cheesy flavor! Can you believe how simple it is to make cheese powder from dehydrated cheese?
The Benefits of Dehydrating Cheese for Long-Term Storage
Shelf Life
Imagine having your favorite cheese available anytime you crave it and for months on end! By mastering how to dehydrate cheese, you can enjoy this privilege and more! You see, dehydrating cheese is a fantastic way to increase the shelf life of your cheese and make it easier to store. With this method, you can enjoy cheddar cheese, mozzarella cheese, or any cheese you like, months after you’ve bought or made them. Properly dehydrated cheese is safe to eat and can be enjoyed for months if stored correctly.
Drying cheese not only extends the shelf life but also reduces the space that the cheese takes up, making it perfect for long-term storage. Got a lot of extra cheese from that family gathering or simply can’t resist a sale? You can dehydrate the cheese and keep it without worrying about your refrigerator space. You can use the fridge to store cheese before or after dehydration, and aging cheese in the fridge for about a week can help develop its flavor.
Keep in mind, that the process of dehydrating cheese at home requires extra thoroughness in the procedure to avoid spoilage.
Storing dried cheese in airtight glass jars or vacuum-sealed bags in a cool, dark place can maximize shelf life for up to 10 years. Dehydrated cheese can last for months if stored properly, especially if vacuum sealed. Dehydrating cheese creates shelf-stable snacks with intense flavors that can last for months or years in airtight containers.
Portability
Dehydrated cheese is a nice addition to homemade trail mix, cereal snack mix, and fruit and nut mixes, and it adds protein, minerals, and vitamins to your trail mix or granola.
As the moisture content in dehydrated cheese is drastically reduced and oil locked in, you’ll find that your home dehydrated cheese is resistant to spoilage and is highly portable. This flexibility can be a game-changer, especially if you frequently go camping or simply want to have a rapid mac-n-cheese meal ready! To learn more about the benefits and process, see why dehydrate food.
Nutritional Value
Further, dried cheese, in your food storage, retains much of its original flavor and can be rehydrated fairly quickly. When rehydrated, the dried cheese powder can be used to make cheese sauce, cheese bread, white sauce for pasta, or even added to popcorn! Sounds fascinating, right?
Food Safety
Now you might wonder, is dehydrating dairy products like cheese safe? Indeed, it is. Thanks to food science, there’s a solid understanding of how moisture affects the stability of food. By removing almost all water from cheese, you eliminate the primary catalyst for bacterial growth. Hence, you create a product that is extremely shelf-stable.
Important to remember is the choice of appropriate storage after dehydrating cheese. Your dried cheese deserves a cool, dark, and preferably airtight container for storage. A glass jar or a vacuum-sealed bag should do the trick. This way, you’re ensuring an even longer shelf life for your no-waste, homemade cheese.
Learning to dehydrate your cheese and preserve it for long-term use can be a fun and rewarding project. Embracing this process, you are not just extending the life of your favorite dairy product, but also embarking on a journey of discovery, saving money, and reducing food waste as you go along.
Can You Use Dehydrated Cheese for Trail Mix?
Definitely! Home dehydrated cheese makes a great addition to any homemade trail mix. Not only does it provide a delicious va-voom of flavor, but it also boosts protein content. You know, that thing that keeps you fueled on long hikes or busy workdays at the office? Yes, that one!
Imagine infusing that store-bought trail mix with a delightful umami crunch from your favorite cheddar or gritty texture from particles of mozzarella. With dehydrated cheese, you can make that delicious dream a reality! Go ahead, and sneak in that little extra cheese into your snack. Who said healthy can’t be flavorful?
Remember, the more you dehydrate cheese, the easier it will get. Practice makes perfect. So don’t hold back, get started today and you might become the new dehydrating cheese whiz in your circle!
Common Mistakes to Avoid
Dehydrating or freeze-drying cheese at home is easy, but a few common pitfalls can get in the way of perfect results.
Not Removing Enough Moisture
If your cheese is too moist, it can lead to mold or spoilage, ruining all your hard work.
Setting the Temperature Too High
High heat can cause your cheese to melt, lose its shape, or even develop an off flavor. Always stick to the recommended low temperature to keep your dried cheese delicious and safe.
Overdrying the Cheese
On the flip side, overdrying your cheese can make it overly crunchy or brittle, which might not be the texture you’re after.
Improper Storage
Proper storage is also crucial. If you don’t store your dried cheese or freeze dried cheese in airtight containers or vacuum-sealed bags, moisture can sneak back in, leading to mold or a loss of flavor.
Food Safety
Don’t forget about food safety—always use clean equipment and handle your cheese with care to avoid contamination.
To summarize, avoid these common mistakes:
Not removing enough excess moisture before drying
Setting the temperature too high
Overdrying the cheese
Improper storage (not using airtight or vacuum-sealed containers)
Neglecting food safety and cleanliness
By steering clear of these common mistakes—removing excess moisture, using the right temperature, storing your cheese properly, and following good food safety practices—you’ll be rewarded with delicious, long-lasting dried cheese every time.
DannyContent Writer
Hey there, since 2016, my mission has been to provide you with the information and guides you need to make food dehydrating simple and fun. Whether you're a newbie or a seasoned pro, my site offers helpful guides, reviews, and recipes to enhance your dehydrating experience. I take pride in only recommending products I believe in, ensuring my readers' trust. As an affiliate of various programs, including Amazon Associates, your support helps me continue providing quality content. Thanks for stopping by, and happy dehydrating!