Dehydrating chamomile is a simple and effective way to preserve this soothing herb for long-term use. In this step-by-step guide, we will walk you through the process of how to dehydrate chamomile in a food dehydrator. By following these instructions, you can ensure that you retain the maximum flavor and medicinal properties of chamomile, which is widely valued for medicinal purposes such as relaxation, anti-inflammatory effects, and overall wellness, while extending its shelf life. Whether you want to create your own chamomile tea blend, use chamomile for tea, or are interested in making tea and using dried chamomile in various culinary recipes, this guide will provide you with all the necessary information to successfully dehydrate chamomile in a food dehydrator.
Introduction to Chamomile
Chamomile is a beloved herb cherished for its gentle, calming effects and soothing aroma, making it a favorite ingredient in herbal tea blends around the world. The chamomile plant, with its delicate, daisy-like flowers, is not only beautiful but also packed with medicinal properties that have been valued for centuries. There are two main types of chamomile: German chamomile and Roman chamomile. While both are used for their health benefits, German chamomile is most commonly chosen for making chamomile tea due to its sweet, apple-like fragrance and potent flavor.
Learning how to dry chamomile is essential for anyone who wants to enjoy the benefits of this herb year-round. Drying chamomile flowers helps preserve their flavor, aroma, and medicinal properties, allowing you to create your own herbal tea blends or use them in a variety of natural remedies. By removing all the moisture from the flowers, drying prevents rot and captures the full flavor of chamomile. Whether you’re growing chamomile in your garden or sourcing fresh flowers, understanding the best way to dry chamomile ensures you get the most out of every harvest.
Chamomile Plant Care
Caring for chamomile plants is a rewarding experience, especially if you’re dreaming of a flourishing herb garden filled with fragrant chamomile flowers. These resilient plants thrive in full sun and well-drained soil, making them a great choice for both beginner and experienced gardeners. To encourage your chamomile plants to produce more flowers, be sure to water them regularly, but avoid overwatering, as chamomile prefers soil that isn’t too soggy.
A little bit of fertilizer during the growing season can give your chamomile an extra boost, resulting in lush growth and an abundance of blooms perfect for making chamomile tea. Whether you’re growing chamomile in garden beds or containers, providing plenty of sunlight and a bit of regular care will reward you with a steady supply of fresh flowers. With just a little attention, your chamomile plants will become a star in your herb garden, ready to provide you with the ingredients for soothing teas and herbal remedies.
Harvesting Chamomile Flowers
Harvesting chamomile flowers is a simple and satisfying process that ensures you capture the plant’s peak flavor and medicinal properties. The best time to harvest chamomile is in the early morning after the dew has dried and before the midday sun. This is when the flowers are in full bloom, with their tiny white petals fully open and the centers bright and golden. This is when the flowers are richest in essential oils and most aromatic—perfect for making chamomile tea.
To harvest chamomile, gently pinch or snip the flower heads just below the blossom, taking care to collect only the freshest, most vibrant flowers. Handle the delicate petals with care to avoid bruising, and gather your harvest in a basket or tray. Regular harvesting not only provides you with a steady supply of fresh flowers for tea and other uses but also encourages your chamomile plant to produce even more blooms throughout the season. With each harvest, you’ll be one step closer to enjoying your own homegrown chamomile tea.
Step 1: Buy Fresh Chamomile Flowers
Hey there, chamomile enthusiast! Ready to start your dehydration journey with fresh chamomile flowers? Good on you! For the best results, always select fresh blooms, as they provide a milder, more subtle flavor and superior aroma compared to dried ones. The first step in the process is to purchase the freshest possible chamomile flowers, ideally harvested after the morning dew has evaporated to preserve their essential oils and quality. When looking for chamomile, keep in mind that the fresher the chamomile, the more aromatic and flavorful your end product will be.
But how can you tell if the chamomile is fresh? We’re glad you asked! Firstly, you should look for chamomile flowers that are fully open, vibrant in color, and free from discoloration or wilting. Make sure you are selecting only the blossoms—focus on the flower head and avoid stems or leaves, as the green parts can lead to a bitter flavor. Secondly, when you gently rub the chamomile between your fingers, you ought to smell a rich, sweet aroma. Not smelling anything? Then chances are, those chamomile aren’t fresh enough, and you may not be using the ideal part, which is the flower head.
Now, you may be wondering where you can buy fresh chamomile flowers. Local farmer’s markets are often a great source, as are websites and stores specializing in herbal and medicinal plants. Look for flowers that have been harvested at the right time, especially after the morning dew has dried. Just remember: fresh is best!
Remember to spread the word about your chamomile dehydrating adventure to friends and family. Who knows? They might just join you on this fun journey, too!
Step 2: Cleaning and Drying the Chamomile
Now that you’ve got your fresh chamomile flowers, it’s time to clean and dry them! You’re standing at the very doorstep of the entire process – isn’t that exciting? So, how do we do this? Believe it or not, it’s a simple, straightforward process!
First off, you’ll want to rinse your chamomile flowers. Just place them in a colander and gently run cool water over them. This will remove any dust or bugs that might be lurking on the flowers. Don’t worry about damaging them — they’re tougher than they look!
Note: While washing, be careful not to crush the petals, they’re the hidden treasure we’re trying to secure!
Once rinsed, it’s time to dry the chamomile. No, we’re not talking about the just yet! We just need to make sure there’s no excess water on the flowers. You can gently pat them dry using a clean kitchen towel, or use a paper towel as an alternative. Use the towel like a loving pat given to your favorite pet —minimal pressure, but enough to make it feel safe and secure.
After patting dry, let the flowers air dry in a dry space for a short period to ensure all moisture is gone before moving to the next step. Air drying is a traditional, gentle method and can be used if you don’t have a dehydrator—just lay the flowers out in a single layer in a cool, dark spot with good airflow. This method ensures the flowers dry evenly and retain their quality.
Patience pays off! Take your time to ensure each of the flowers is nice and dry. Remember, an efficient drying process now sets the stage for an optimal dehydration process later. Good work pays off in the end!
Finally, remove the petals from the stems. It’s easy! Just simply slide your fingers down the stem, and the petals should pop right off. And voila! You’ve successfully cleaned and dried your chamomile flowers, and they’re ready for the food dehydrator. It wasn’t that hard, was it? Now, onto the next fun steps!
Step 3: Preparing the Food Dehydrator
Are you excited to start dehydrating your chamomile but not sure exactly how to get your dehydrator ready to go? Don’t worry; we’ve got you covered!
Firstly, you need to take a close look at your dehydrator. Make sure there’s no residual dust or particles from previous uses. Your dehydrator should be sparkling clean before you introduce the chamomile flowers into it. If you notice any leftover bits or any grime, give it a thorough cleanse. After all, you’re eager to maintain the purity and integrity of your chamomile, right?
Pro-Tip: You can clean the dehydrator trays with warm water and dish soap. Rinse them carefully and ensure they’re completely dry before using. The last thing you want is water in your dehydrator when you’re trying to remove moisture!
Once your dehydrator is squeaky clean, you’ll need to assemble it. Many dehydrators come with stackable trays while others might have slide-in trays. Whichever style you have, make sure to assemble the trays correctly. If your dehydrator comes with a solid sheet or mesh liner that prevents small pieces from falling, don’t forget to insert them! For best results, use a lined dehydrator tray or place a mesh screen on the tray to prevent the small chamomile flowers from falling through or being blown around during drying. These can be particularly handy in ensuring your delicate chamomile flowers don’t slip through the trays.
We’re almost there! The final step? Choose the spot where you’ll place the dehydrator. It should be on a flat, stable surface in a well-ventilated area, away from any water sources or heat-generating appliances. Keep in mind the dehydrator will generate heat and needs its space to effectively do its job.
Who knew the setup could be such a cinch? With these simple steps, you have successfully prepared your food dehydrator. Next stop – dehydrated chamomile!
Step 4: Spreading the Chamomile Flowers on the Dehydrator Trays
Now that we’ve prepared our food dehydrator, it’s time to place our chamomile flowers onto the dehydrator trays! We want to achieve even dehydration, so let’s make sure we spread them out quite right.
Start by taking each chamomile flower and placing them face up on the food dehydrator trays. Remember that careful placement here is essential. You’ll want to lay them out in a single layer, with enough space between each flower. This is crucial for uniform drying. Just think about it: too crowded, and we might end up with unevenly dehydrated chamomile. Nobody wants that!
- Tip: Use a pair of tweezers or a small spatula for precise flower placement. It’s as much a science as it is art!
- Note: Make sure your flowers aren’t touching — this could potentially lead to areas of the flower remaining moist and susceptible to mold growth during storage.
If you don’t have a dehydrator, you can use a baking sheet in the oven. Simply spread the chamomile flowers in a single layer on the baking sheet for efficient and even drying.
Let’s be honest here, who thought that dehydrating chamomile could involve such a detailed process? But trust us, once you’ve mastered it, you’re bound to see this as a fun and rewarding activity!
We’re now ready to move onto the big event – setting the temperature and time for dehydration. Ready to take this head-on? Let’s do this!
Step 5: Setting the Temperature and Time
Now, this is where things get a little technical, but don’t worry! We’ve got this! To dehydrate chamomile correctly, the magic numbers to remember are 95 and 12. That’s 95 degrees Fahrenheit and 12 hours on the clock. Yes, patience will be your best friend here!
Adjust the temperature setting of your food dehydrator to 95 degrees Fahrenheit. Lower temperatures are key when drying delicate chamomile flowers to preserve their wonderful scent and beneficial properties. For best results, always use the lowest temperature possible to avoid cooking or damaging the flowers. Keep your trusty timer set at 3 hours initially. Remember, the drying time can vary depending on the model of your dehydrator and the moisture content of your chamomile blossoms.
Pro tip: Not all have precise temperature controls. If yours doesn’t, don’t fret! Just set it to the lowest setting. And keep a check, alright?
Once you’ve set the temperature and timer, it’s time to press the start button and let the dehydrator do its thing. Imagine all the wonderful teas, skincare products, and soothing aromatherapy experiences your dehydrated chamomile will contribute to.
Feeling thrilled? We sure are!
Step 6: Monitoring the Dehydration Process
The next step is crucial. It’s time to talk about monitoring the dehydration process, a task that requires diligence and careful attention. If you’re curious about whether a dehydrator actually cooks meat, it’s important to understand how the process works and what safety steps to follow.
When it comes to dehydrating chamomile, we must understand that not all flowers dehydrate at the same rate. You’ll need to keep a keen watch on the dehydrator, to ensure that none of the flowers are dehydrated too much or too little.
Remember, successful dehydration is an act of balance!
The top-most layer usually dehydrates quicker, thanks to its direct exposure to the heating element. It’s a good idea to rotate the trays periodically, to ensure an even dehydration across all layers. Keep in mind, the process of dehydration, depending on the model of your dehydrator and the moisture content of your chamomile, usually takes between 1 to 5 hours.
You might be wondering: How would I know if my chamomile flowers are perfectly dehydrated?
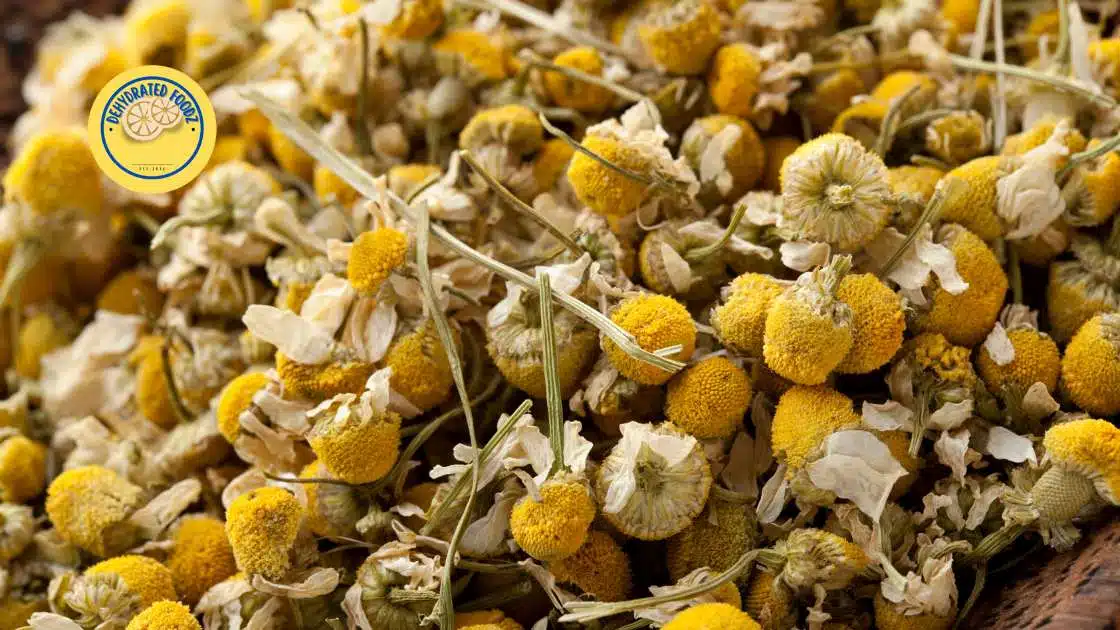
Well, your goal is to have completely dried flowers. Dehydrated chamomile flowers should be brittle and crack under pressure, the petals retaining a faint shade of their original color. In essence, these dried flowers should feel dry and appear light and airy, and not display any signs of mildew or discoloration. Make sure the flowers are completely dried before storage to ensure quality and prevent mold.
It’s practically impossible to over-dry your herbs, but remember, under-drying can lead to mold growth so be watchful!
After around 2 hours of drying, start checking your chamomile flowers every half hour or so. Use a clean and dry hand or a pair of tongs to gently prod and test the dryness of your flowers.
If your flowers meet the criteria mentioned earlier, you’re successful in your mission! And if not, don’t lose hope. Just put them back in the dehydrator and continue the process.
By meticulously monitoring the dehydration process, we ensure that we get the best results for our efforts: perfectly dehydrated chamomile flowers that promise the soothing aroma and benefits of chamomile in every use.
Step 7: Cooling and Testing the Dehydrated Chamomile
We’ve finally made it to one of the most pivotal stages in the dehydration journey, folks! Kudos to you for your persistence.
At this point, your has done its job beautifully. Ahead of you lie the chamomile flowers, shrunken and transformed, retaining the essential nutrients but devoid of moisture. But, don’t rush to use them just yet. A little cooling-off time is now in order before we conduct the true test of successful dehydration.
- Patience is a virtue: After turning off the dehydrator, ensure you don’t remove the chamomile flowers right away. Permit them to stay in the dehydrator for another hour. This lets them cool down gradually and helps retain the structural integrity of the flowers.
- The Squeeze Test: Carefully remove a flower and gently squeeze it between your fingers. A perfectly dehydrated chamomile flower will feel entirely dry and will crumble with applied pressure. If the flower is still resilient or bends without breaking, it contains residual moisture, and dehydration must continue a little longer. Compared to air dried chamomile, which may feel slightly softer due to slower moisture loss and natural airflow, dehydrator-dried flowers should be crisp and brittle.
- The Storage Test: Store a small batch of cooled, dehydrated chamomile flowers in an airtight glass jar for a day or two. Keep an eye on the jar for any condensation forming on the sides. Any moisture observed indicates incomplete dehydration, and the flowers need more time in the dehydrator.
Step 8: Storing the Dehydrated Chamomile Properly
You’ve successfully gathered, cleaned, dried, prepared, monitored, and cooled your lovely chamomile, but what comes next? Let’s dive into how you can keep your hard-won dehydrated chamomile delightfully fresh and flavorful for as long as possible!
First off, let’s talk about containers:
You’re going to need a sealed glass jar, ideally airtight and preferably dark-colored. This isn’t just for aesthetics, though it does look incredibly chic on your kitchen counter! The dark color helps to protect your chamomile from damaging light, preserving its quality and extending its shelf life. Using a sealed glass jar is also the best way to store other dried herbs to maintain their freshness and potency.
Secondly, the environment:
Your chamomile, in its new chic home, prefers a cool, dark and dry place. A pantry or a cupboard away from any major sources of heat is an ideal spot. Heat and light, especially direct sunlight, can degrade the quality of your chamomile, making it lose its flavor and aroma. So, avoid windowsills or tops of refrigerators. Pro tip: a cellar is an absolute sweet spot!
Here’s how you should do it:
- Ensure your chamomile is completely cool before storing. This prevents condensation which might cause mold growth.
- Scoop your dehydrated chamomile into your airtight glass jar. Fill it up but don’t pack it in too tightly!
- Carefully screw the lid back on ensuring it’s tightly sealed to prevent any air from seeping in.
- Store in your chosen cool, dark, and dry place away from any heat sources and out of direct sunlight.
These storage practices apply to other dried herbs as well, helping to preserve their flavor, color, and natural benefits.
Follow these steps and you’ll be savoring the unique taste and aroma of your own, home-dehydrated chamomile for up to a year.
Remember, the key to storage is the enemy’s trio: heat, light, and moisture. Defeat these three and you’re on your way to enjoying chamomile anytime, anywhere!
Harvesting Chamomile Seeds
If you’d like to grow more chamomile plants in the future, harvesting chamomile seeds is a simple way to ensure a continuous supply. After the flowering season, allow some of the flower heads to dry completely on the plant. Once they’re fully dried, gently rub the flower heads between your fingers to release the tiny chamomile seeds.
Collect the seeds in a paper bag or envelope, making sure to label and date them for easy identification. Store your chamomile seeds in an airtight container in a cool, dry place until you’re ready to plant them. Chamomile is best grown from seed, scattering them onto compost in a sunny area around 4-6 weeks before the last frost. By saving seeds from your own chamomile plants, you can enjoy fresh flowers for tea year after year, making your herb garden even more self-sustaining and rewarding.
Creative Ways to Use Dehydrated Chamomile
Exciting news, folks! Your dehydrated chamomile isn’t limited to tea. You can use this wonderfully fragrant herb in an array of innovative ways. Ready to explore? Alright, let’s dive right in!
- Bath Soaks: What’s better than a hot, calming bath? A hot, calming bath with chamomile, that’s what! Your dehydrated chamomile can serve as a fantastic addition to bath soaks. It can help soothe your skin and mind after a long day.
- Candles or Potpourri: Chamomile’s pleasant aroma can kick up your homemade candles or potpourri a notch. Feeling crafty? Use this fragrant ingredient in sachets or decorative potpourri to add a touch of elegance to your home!
- Homemade Soap: Why settle for ordinary soap when you can get super creative? Embed your dehydrated chamomile into your homemade soap base for an aromatic lather. It’s unique, personal, and oh-so-amazing!
- Chamomile Oil: This one might surprise you, but yes, you can make oil from your dehydrated chamomile! Infuse the flowers in a carrier oil of your preference, and voila! You have your DIY, fragrant chamomile oil ready!
- Culinary Use: How about adding some pasa-zing to your dishes with a chamomile twist? Sprinkle dehydrated chamomile flowers into salads, and desserts, or use them as garnish. Trust us, it’ll be a flavor fest!
- Brewing the Perfect Cup of Tea: Place your dehydrated chamomile flowers in a tea infuser or tea ball, then pour hot water or boiling water over them to steep. This method helps extract the soothing flavors and aromas. For a unique blend, try combining chamomile with other herbs in your tea infuser. Enjoying a cup of tea made from your own dehydrated chamomile is a comforting, traditional home remedy and a truly relaxing experience.
Conclusion
Chamomile is a truly versatile and beneficial herb, perfect for anyone looking to enjoy the soothing qualities of chamomile tea or explore the world of herbal remedies. By learning how to grow, harvest, and dry chamomile flowers, you can take full advantage of this gentle herb’s calming effects and delightful flavor. Whether you’re a seasoned gardener or just starting out, chamomile is an easy and rewarding addition to your collection of herbs.
With the simple steps outlined in this article, you’ll be able to harvest and dry chamomile flowers, store dried chamomile flowers for up to a year, and create your own delicious teas and herbal blends. Embrace the tradition of homegrown chamomile tea and enjoy the many benefits of dried chamomile flowers from your own garden. Happy harvesting!
Hey there, since 2016, my mission has been to provide you with the information and guides you need to make food dehydrating simple and fun. Whether you're a newbie or a seasoned pro, my site offers helpful guides, reviews, and recipes to enhance your dehydrating experience. I take pride in only recommending products I believe in, ensuring my readers' trust. As an affiliate of various programs, including Amazon Associates, your support helps me continue providing quality content. Thanks for stopping by, and happy dehydrating!