If you’re searching for how to make biltong in a food dehydrator, you’re in the right place. Biltong, a traditional dried and cured meat delicacy from Southern Africa, is an excellent snack known for its unique and tantalizing flavor. This guide is for home cooks and food enthusiasts interested in making authentic biltong using a food dehydrator. Making biltong at home allows you to control ingredients and customize flavors to your preference, ensuring a healthier and more personalized snack. Biltong can be made using a food dehydrator, making the process more accessible and convenient for modern kitchens. Traditionally, biltong is made by allowing the meat to air dry in open air, emphasizing the importance of airflow and environment in the curing process. While conventional methods of making biltong involve air drying, advances in technology now allow us to use modern devices, such as food dehydrators, to achieve similar results. This guide will provide detailed instructions on how to make biltong in a food dehydrator.
Biltong, derived from the Dutch words ‘bil’ (buttock) and ‘tong’ (strip), refers to long strips of spiced and dried meat. It originated in Southern Africa, where the meat was air-dried in the hot African sun. Traditionally, biltong was made by meat hanging from hooks to dry in the open air, which helped achieve its authentic texture and flavor. Air drying and curing were essential methods used to preserve meat for long periods, preventing spoilage and ensuring a safe food supply.
Today, biltong is traditionally made from beef and can also be made from game meats like kudu, ostrich, and venison. Making your own biltong at home continues this tradition, offering both a connection to cultural heritage and the satisfaction of crafting your own biltong.
Biltong vs. Jerky
While both biltong and jerky are forms of dried meat, they differ significantly in preparation and taste. Making jerky and biltong both require selecting lean meats to ensure quality and shelf life. Biltong is cured and then air-dried, while jerky is often marinated and then smoked or cooked at a low temperature. In comparison, American jerky is usually drier and more processed, often using ingredients like brown sugar, which gives it a distinct taste and texture compared to traditional biltong. Furthermore, biltong is typically cut thicker than jerky, resulting in a different texture and flavour profile. Some biltong recipes use brown vinegar to enhance the flavour, which sets it apart from the ingredients commonly found in American jerky.
Understanding Biltong Origins
Biltong is more than just a snack—it’s a cherished part of South African heritage, with roots stretching back to the early Dutch settlers of Southern Africa. These pioneers needed a reliable way to preserve meat during long journeys and harsh seasons, so they developed a curing process that combined salt, vinegar, and a blend of robust spices. The word “biltong” itself comes from the Dutch “bil” (buttock) and “tong” (strip), reflecting the traditional method of slicing beef or game meats into long, thick strips before drying.
The authentic flavor of biltong is deeply tied to its origins. Essential spices like coriander seed and black pepper, along with vinegar, are at the heart of the curing process. These ingredients not only add distinctive taste but also help preserve the meat, transforming it into the dried meat delicacy beloved across Southern Africa. The drying process, whether done in the open air or with modern tools, is what gives biltong its unique texture and rich, savory flavor. By understanding the history and traditional methods behind biltong, you can better appreciate the craft and enjoy making your own South African biltong at home.
Choosing the Right Meat
When making biltong, the choice of meat is essential. Traditionally, beef is the most commonly used meat, but biltong is also made from game meats like kudu, ostrich, and venison. However, you can also make game meats like venison and even exotic choices like kangaroo. Lean cuts of beef such as silverside, topside, or eye of round are recommended for making biltong. The key is to choose lean cuts, as fat can go rancid and reduce your biltong’s shelf life. Some people prefer to use steaks for biltong, as they are easy to slice and prepare. While a little fat can enhance the flavour and texture of biltong, too much fat can be unpleasant. Be sure to trim off any silver skin from the meat before curing, as it can affect the texture and flavour absorption.
The best cuts for making biltong are lean ones, as they have less fat that can spoil. When preparing your meat, keep in mind that thicker strips will take longer to dry and will result in a chewier texture, so it’s important to consider the thickness when slicing your biltong. Choices like the bottom round or top round are popular. If you prefer a bit of fat for added flavor and texture, you can trim it to your liking.
When preparing the strips for drying, it’s helpful to identify the thickest end of each piece so you can attach hooks or string there during the drying process. Drying hooks, or even metal paper clips, can be used to suspend the meat strips, ensuring even airflow and preventing mold.
Cutting the Meat
The meat should be cut into thin strips, no more than 1 inch thick, as this is the ideal thickness for biltong. It’s important to cut the meat along the grain. This results in a final product that is easier to chew. A top tip for easier cutting is to freeze the meat for about an hour before slicing.
Seasoning the Meat
The next step in making biltong is seasoning the meat. For authentic flavour, it is important to use all the spices in your blend. The traditional biltong recipe involves marinating the meat in a combination of vinegar, salt, sugar, and other spices, including ground coriander seeds as part of the spice blend for curing and flavoring the biltong. Toasted coriander seed enhances the flavour and aids in curing by releasing its oils. Toasting coriander seeds releases oils that not only enhance flavor but also help suppress bacterial growth. Sprinkle the spice mix evenly over the meat to ensure thorough coverage before proceeding to the next step.
Traditional Biltong Spices
The most common spices used in biltong are:
Coriander
Black pepper
Sometimes chili
The spices are mixed with coarse salt and vinegar (usually apple cider vinegar or red wine vinegar) to create a marinade. This mixture acts as the biltong cure, which is essential for developing the traditional flavour and preserving the meat. The meat is then soaked in this marinade for a few hours to absorb the flavors.
The Curing Process
The curing process is the heart of making biltong, transforming simple cuts of meat into a flavorful, preserved delicacy. To begin, carefully trim any excess fat from your chosen meat using a sharp knife or kitchen shears—this helps prevent spoilage and ensures a longer shelf life for your homemade biltong. Next, slice the meat into thin strips, ideally cutting with the grain for that classic biltong texture. Consistency is key, so try to keep all the slices uniform in thickness to ensure even curing and drying.
Preparing the Spice Mix
Now it’s time to prepare your spice mix. Traditional biltong recipes call for a blend of coriander seeds, black pepper, and salt, but you can personalize your mix with other spices like chilli flakes or a dash of brown sugar for a hint of sweetness. For the best flavor, use a pestle or spice grinder to freshly grind your coriander seeds and black pepper—this releases their essential oils and intensifies the aroma. Combine your ground spices with salt, brown sugar, and a splash of vinegar—apple cider vinegar or red wine vinegar are both popular choices for their tangy depth. Some biltong enthusiasts also add Worcestershire sauce or cider vinegar for an extra layer of flavor. Chili flakes can be added for additional heat, but they are optional.
Marinating the Meat
Once your spice mix is ready, coat all the meat thoroughly, making sure every surface is covered. Massage the mixture into the meat to help the flavors penetrate deeply. Arrange the coated strips in a single layer in a non-reactive dish or tray, and pour any remaining marinade over the top. Cover and refrigerate, allowing the meat to cure for several hours or up to a couple of days, depending on your personal preference and the specific biltong recipe you’re following. During this time, the salt and vinegar work together to cure the meat, drawing out moisture and infusing it with rich, complex flavors.
Before moving on to the drying process, it’s important to pat dry each strip with a paper towel to remove excess moisture—this step helps prevent bacterial growth and ensures a better texture in the finished product. Whether you’re using a traditional biltong box, a drying box, or a modern dehydrator like the Excalibur dehydrator, arrange the cured meat so there’s good air circulation around every piece. If you’re using the hanging method, suspend the strips from hooks or string in a well-ventilated area with a little air movement to encourage even drying.
The drying time will vary based on the thickness of your slices, the amount of air movement, and your desired level of dryness. Some prefer their biltong slightly pink and tender in the center, while others like it dry and chewy—adjust the drying process to suit your taste. Drying biltong too quickly can lead to case hardening, where the outside becomes tough and traps moisture inside.
By mastering the curing process, you’re well on your way to making biltong that rivals the best from Southern Africa. With a bit of practice and experimentation, you can develop your own signature spice blend and perfect your homemade biltong, whether you use a biltong box, a drying box, or a food dehydrator.
How to Make Biltong in a Food Dehydrator (Step-by-Step Checklist)
Follow these steps to make biltong using a food dehydrator:
Select Your Meat: Choose a lean cut of beef (such as silverside, topside, or eye of round) or game meats like kudu, ostrich, or venison.
Trim and Slice: Trim off excess fat and silver skin. Slice the meat into strips about 1 inch thick, cutting along the grain.
Prepare the Spice Mix: Toast and grind coriander seeds, black pepper, and any additional spices. Mix with coarse salt, brown sugar (optional), and vinegar (apple cider or red wine vinegar).
Marinate the Meat: Coat the meat strips thoroughly with the spice mix and vinegar. Arrange in a non-reactive dish, cover, and refrigerate for several hours or overnight.
Pat Dry: Remove the meat from the marinade and pat each strip dry with paper towels to remove excess moisture.
Arrange in Dehydrator: Place the meat strips in your food dehydrator, ensuring space between each piece for good airflow.
Set Temperature: Set the dehydrator to a low temperature (86°F/30°C to 95°F/35°C) to dry the meat slowly without cooking it.
Dry the Meat: Allow the meat to dry for 12 to 24 hours, checking periodically for your desired texture.
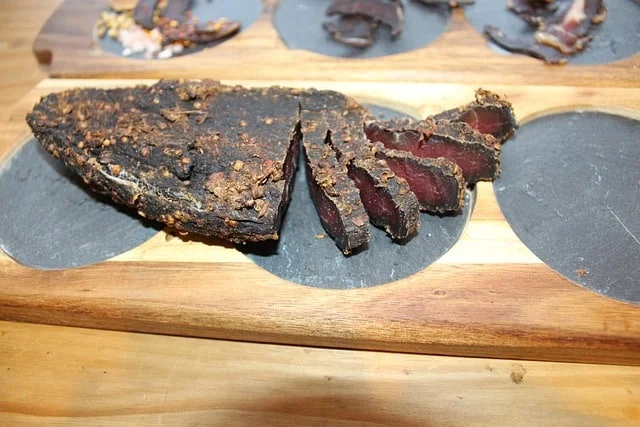
Check for Doneness: The biltong should be firm, with no visible moisture. If you prefer a slightly moist center, remove earlier.
Store Properly: Once dried, store your biltong in an airtight container, refrigerate, or vacuum seal for longer shelf life.
Drying the Meat
The drying process is a critical step in making biltong. Normally, biltong is air-dried over several days to produce dry biltong with the right texture and flavour. It is important to have air running past the meat during drying to ensure even moisture removal and prevent mold. While some heat may be used to help circulate air, the focus should be on slow, cool drying rather than cooking the meat. Drying times can vary depending on humidity, airflow, and temperature, so it’s important to check the meat periodically to monitor doneness. However, with a food dehydrator, the process can be significantly sped up without sacrificing the quality of the biltong. To avoid case hardening, minimize excessive airflow and ensure a gradual drying process.
Using a Food Dehydrator
A food dehydrator is a kitchen appliance that extracts moisture from food to help in its preservation. When using a food dehydrator to make biltong, it’s crucial to set the device at a low temperature to dry the meat slowly and avoid cooking it.
Setting Up the Dehydrator
When setting up the dehydrator, make sure there is enough space between each piece of meat to allow for good airflow. This will ensure that the meat dries evenly. If you want to dehydrate food in an air fryer, the dehydrator should be set to the lowest temperature setting, usually around 86F (30°C) to 95F (35°C).
The Drying Process
The drying process in a dehydrator can take anywhere between 12 to 24 hours, depending on the thickness and fat content of the meat. This drying time ensures the meat achieves the desired texture and flavor.
Monitoring Drying Progress
It’s advisable to check the biltong every few hours during the drying process. The meat should be firm to the touch, with no visible moisture. To check if the biltong is ready, there should be no give when pinched. If the meat still feels wet inside when pinched or squeezed, it needs more drying time to achieve the desired toughness and dryness. If you prefer your biltong a bit moist in the center, you can remove it from the dehydrator earlier.
To determine if the biltong is ready to eat, you can taste a small piece and see if the texture and flavor meet your preference.
Tips for Making Perfect Biltong
Achieving perfect biltong at home is all about attention to detail and a few tried-and-true techniques:
Select a lean cut of beef, such as silverside or topside, and carefully trim away any excess fat or silver skin for the best texture and shelf life.
Use a sharp knife to slice the meat into thin slices—about 1cm thick—cutting along the grain to ensure your biltong is tender and easy to chew.
For the most flavorful results, grind your coriander seeds and other spices using a spice grinder or a mortar and pestle. This releases the essential oils and aromas that define a great biltong recipe.
Don’t be afraid to experiment with other spices to suit your personal preference—homemade biltong is all about making it your own.
To infuse extra flavour, marinate the meat in a biltong cure overnight. This typically includes vinegar, Worcestershire sauce, and your chosen spice mix.
Once marinated, hang the meat in a biltong box or use a food dehydrator to ensure good airflow and an even drying process.
Whether you’re using a traditional biltong box or a modern dehydrator, the key is to hang the meat so air can circulate freely around each strip.
With these tips, you’ll be well on your way to making biltong that’s full of flavor and perfectly dried every time.
Troubleshooting Common Issues
Even seasoned biltong makers can encounter a few bumps along the way, but most issues are easy to fix with a little know-how. If you notice your biltong isn’t drying evenly, check that your dehydrator or biltong box has good airflow and that the meat is sliced into thin, uniform pieces. Adjusting the temperature or humidity can also help achieve the perfect biltong texture.
Mold growth is another common concern. To prevent this, always pat dry the meat thoroughly with a paper towel before hanging, and make sure your drying area is clean and well-ventilated. If you’re looking for a flavor boost, try using apple cider vinegar or cider vinegar in your marinade, and don’t hesitate to add more spices to suit your taste. For more information on meat preservation methods, visit this guide.
If your biltong seems bland or lacks depth, experiment with different spice blends or increase the curing time. Remember, the drying time can vary depending on the thickness of your slices and the environment, so check your biltong regularly to ensure it’s drying evenly. With a bit of attention and the right equipment—like a quality dehydrator or biltong box—you’ll be able to troubleshoot and perfect your homemade biltong every time.
Storing the Biltong
Once the biltong is done drying, it needs to be stored correctly to ensure it stays fresh. Storing biltong in the fridge helps prevent mold growth and keeps it fresh for longer. For extended preservation, biltong can be vacuum sealed after drying.
Proper Biltong Storage
Biltong can be kept in an airtight container at room temperature for a few days. For longer storage, you can refrigerate or freeze it. If you choose to freeze your biltong, be aware that it may slightly alter its texture and taste.
Enjoying Your Homemade Biltong
Now that you know how to make biltong in a food dehydrator, it’s time to enjoy your homemade snack! For convenience and easy snacking, you can slice your dried biltong into bite sized pieces. The amount of fat in your biltong can influence the eating experience, as larger fat chunks may be less pleasant to eat.
Serving Suggestions
Biltong can be enjoyed as is, or used as an ingredient in a variety of dishes. For the best texture and flavour, slice the biltong into thin slices with a sharp knife before serving. It’s perfect for a protein-packed snack on the go, or as a unique addition to salads, pizza toppings, or even scrambled eggs.
Experimenting with New Flavors
One of the joys of making biltong at home is the freedom to experiment with new flavors and ingredients. If you love a bit of heat, try adding garlic powder or chilli to your spice mix for a bold, spicy kick. For a tangy twist, swap out traditional vinegar for balsamic or white wine vinegar, or even try apple cider vinegar for a subtle sweetness.
Don’t be afraid to branch out with different meats—venison, beef jerky cuts, or even other game meats can bring a unique taste and texture to your biltong. Use your favorite biltong recipe as a foundation, then adjust the spices and ingredients to match your personal preferences. Keep a record of your experiments so you can recreate your favorite batches or tweak them for even better results.
Whether you’re making biltong for a classic taste or exploring new combinations, the possibilities are endless. Just remember to use high-quality meat and spices, follow safe food handling practices, and have fun discovering your own signature biltong flavor. With a little creativity, you’ll turn every batch into a great snack that’s uniquely yours.
Final Thoughts
Making biltong in a food dehydrator is a convenient and straightforward way to enjoy this traditional South African treat. It provides the flexibility to customize your biltong to your taste preferences and the satisfaction of creating a homemade snack that’s both delicious and nutritious.
Frequently Asked Questions
Can I Use Any Other Type of Meat?
Yes, you can make biltong from a variety of meats. While beef is the most common choice, you can also have lamb, venison, or even poultry. Keep in mind that the flavor and texture may vary depending on the type of meat used.
What If I Don’t Have a Food Dehydrator?
While a food dehydrator makes the process easier and quicker, it’s possible to make biltong without one. The traditional method involves air drying the meat in a cool, well-ventilated area. This process can take several days to a week, depending on the climate and humidity levels.
Can I Make Biltong with Pre-Ground Spices?
Yes, you can use pre-ground spices to make biltong. However, freshly ground spices tend to have a stronger flavor and aroma, which can enhance the taste of your biltong.
Hey there, since 2016, my mission has been to provide you with the information and guides you need to make food dehydrating simple and fun. Whether you're a newbie or a seasoned pro, my site offers helpful guides, reviews, and recipes to enhance your dehydrating experience. I take pride in only recommending products I believe in, ensuring my readers' trust. As an affiliate of various programs, including Amazon Associates, your support helps me continue providing quality content. Thanks for stopping by, and happy dehydrating!