That compact toaster oven sitting on your counter can do more than reheat pizza and toast bread. With the right technique, it transforms into an effective dehydrator for fruits, vegetables, herbs, and even jerky—no standalone dehydrator required.
If you’ve ever considered dehydrating food at home but hesitated at the $100–$300 price tag of a dedicated dehydrator, your toaster oven offers a practical alternative, especially while you learn the basics that also apply when using a standard food dehydrator. Most kitchens already have one, and unlike bulky appliances that collect dust, a toaster oven earns its counter space through everyday use.
Here’s why this approach works well for many home cooks:
Saves space – No need to store another single-purpose appliance
Uses existing equipment – Perfect for apartments, RVs, and compact kitchens
Ideal for small batches – Dehydrate what you need without committing to full trays
Budget-friendly – Skip the equipment cost entirely
Yes, you can dehydrate food in a toaster oven by using very low heat and maintaining good airflow with the door slightly open. Many toaster ovens feature “warm,” “dehydrate,” or settings between 120–200°F (50–95°C), making them suitable right out of the box. Even basic models without these presets can work with careful monitoring.
Beyond convenience, dehydrating food extends shelf life dramatically, concentrates flavors into intense bites, and helps reduce food waste from seasonal garden gluts or bulk grocery purchases, offering lightweight, space-saving, nutrient-preserving benefits for everyday use or trips. That surplus of summer tomatoes or fall apples doesn’t have to go to waste anymore.
Understanding the Dehydration Process
Dehydration removes moisture from food to a level where bacteria, yeast, and mold can’t grow—typically reducing water content below 20%. Unlike cooking, which uses high heat to transform ingredients, the drying process relies on gentle, sustained warmth over extended periods.
The ideal dehydrating temperature ranges from 120–160°F (50–70°C), depending on what you’re drying, and a food dehydration chart with times and temperatures can help you dial things in more precisely:
Food Type
Temperature Range
Why This Range
Herbs
95–120°F (35–50°C)
Preserves delicate oils and color
Fruits
130–145°F (54–63°C)
Prevents cooking while removing moisture
Vegetables
125–135°F (52–57°C)
Maintains texture without scorching
Meats (jerky)
145–160°F (63–70°C)
Food safety requires higher temps
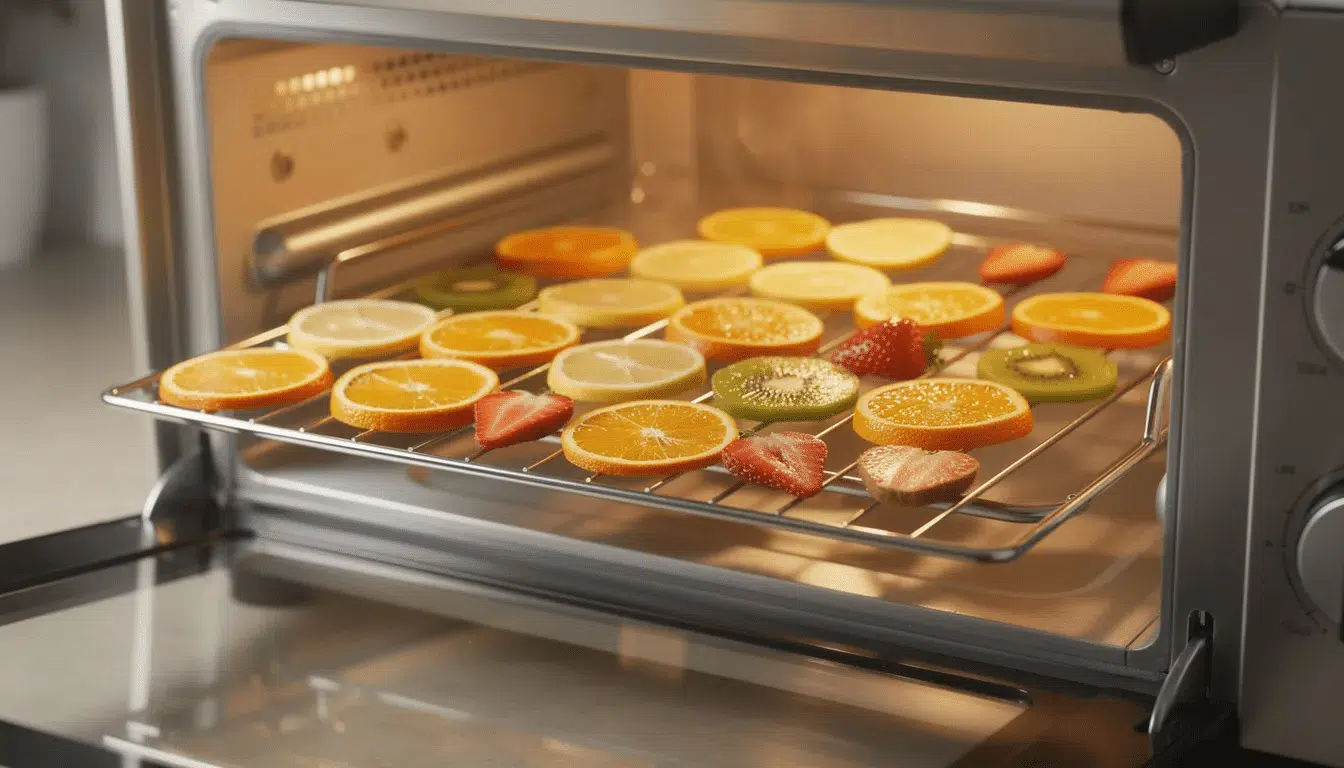
Your toaster oven mimics dedicated dehydrators by providing gentle heat plus time plus air circulation. The key difference is that you’ll need to prop the door open slightly so moisture can escape rather than recirculating inside the cavity.
Target textures vary by food: fruits should become leathery but pliable, most veggies and herbs should turn brittle, and jerky should feel dry and fibrous with no visible moisture when torn. Approximate times range from 2–4 hours for thin apple slices to 6–10 hours for chewier fruits or jerky, though your specific oven and slice thickness will affect these numbers significantly.
Equipment Needed for Toaster Oven Dehydration
The good news: most tools required for toaster oven dehydration are common kitchen items. You don’t need specialized dehydrator trays or expensive accessories, though dedicated budget food dehydrators for home use can be a worthwhile upgrade once you’re hooked on drying foods.
Essential equipment:
Toaster oven – Look for adjustable low temperature settings down to at least 150°F (65°C), or a “warm” setting. Models with convection fans often dry more evenly by circulating air throughout the cavity.
Wire racks or cooling racks – The toaster oven’s included wire rack works well, or add an oven-safe cooling rack so air reaches both sides of the food. This is far better than placing food directly on a solid baking sheet, which traps moisture underneath.
Liners (optional) – Parchment paper or silicone baking mats can catch drips when placed under a rack. Avoid putting liners directly under food if they block airflow.
Oven thermometer – A small probe thermometer helps verify actual internal temperature, since toaster oven dials can be inaccurate by 25°F or more.
Optional tools:
Sharp knife or mandoline for uniform thin slices
Cutting board
Bowls for pretreating (lemon water, salt brine, marinades)
Airtight jars or vacuum bags for storage
The secret to success with this simple setup is consistency—uniform slices on properly spaced racks with accurate temperature control.
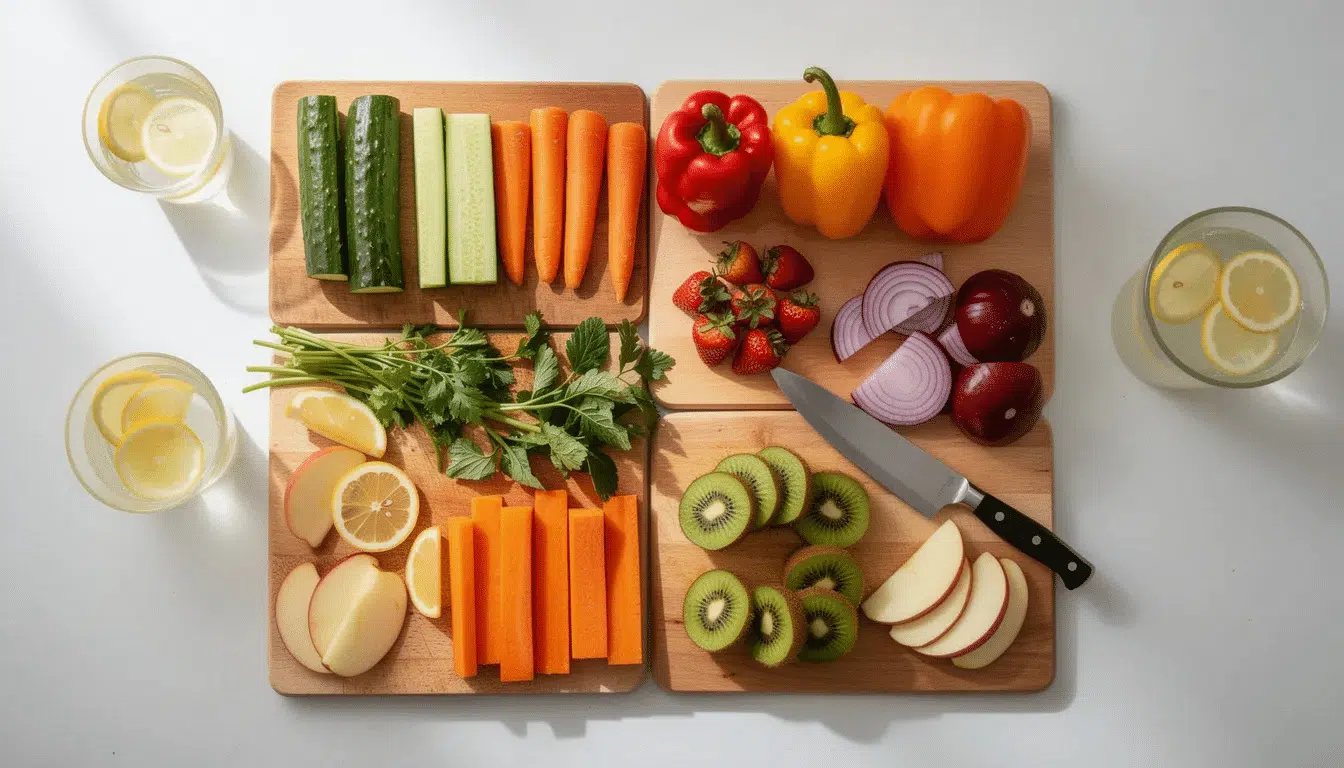
Prepping Foods for Toaster Oven Dehydration
Good prep work leads to faster, more even drying and better color and flavor in your finished products, no matter which foods you choose to dehydrate for snacks and meals. Taking an extra few minutes to prepare properly pays dividends in quality.
Fruits
Wash thoroughly, then core or pit as needed. Slice fruits 1/8–1/4 inch thick using a sharp knife or mandoline for consistency. For light-colored fruits like apples, pears, and bananas, pretreat in lemon water (1 tablespoon lemon juice per cup of water) for 5 minutes to reduce browning.
Vegetables
Wash, trim, and slice thin—consistency matters here. Some veggies like carrots and green beans benefit from a brief 2–3 minute blanch in boiling water followed by an ice water bath before dehydrating. This step helps preserve color and texture in the final product.
Herbs
Rinse gently under cool water, then pat dry thoroughly with clean towels. Strip leaves from thick stems and spread in a single layer to avoid clumps. Herbs are delicate, so handle them carefully to retain their essential oils.
Meats (for jerky)
Food safety is critical here. Use lean cuts and trim all visible fat, which can turn rancid. Slice thinly against the grain for easier chewing later. Marinate with salt and seasonings overnight in the refrigerator. Plan to preheat your oven to a slightly higher temperature at the beginning—around 165°F (74°C)—to quickly bring meat through the temperature danger zone before lowering heat for the longer drying process.
General note: Pat all foods dry with a clean towel before placing them in the toaster oven. Removing surface moisture speeds up dehydration and prevents early condensation inside the oven cavity.
Step-by-Step: How to Use a Toaster Oven as a Dehydrator
This is where theory meets practice. Follow these steps for consistent results every time you dehydrate.
Step 1: Preheat Your Toaster Oven
Set your toaster oven to around 135–150°F (57–65°C) or the lowest “warm” setting available. Use a thermometer to verify the actual temperature and adjust the dial as needed—mastering ideal temperature settings for food dehydration is key to consistent results. Give it 10–15 minutes to stabilize before adding food.
Step 2: Arrange Food Properly
Place slices on wire racks in a single layer with small gaps between pieces so air can circulate freely. Never stack or overlap slices—this traps moisture and creates uneven drying. If your oven has multiple rack positions, use them all for larger batches.
Step 3: Position the Door
Prop the toaster oven door slightly open—about 1–2 inches—using a metal spoon, wooden utensil, or heat-safe object. This allows steam to escape rather than condensing inside. Keep children and pets away from the area during the drying process.
Step 4: Monitor and Rotate
Check progress every 30–60 minutes. Rotate racks front-to-back and top-to-bottom to prevent hot spots and ensure even drying. Flip individual pieces if one side appears to be drying faster than the other.
Remember: dryness tests matter more than the clock. Your oven may run hotter or cooler than average.
Step 6: Test for Doneness
Bend test for fruit – Should bend without oozing any moisture; leathery but pliable
Snap test for herbs – Leaves crumble easily between fingers
Tear test for jerky – Fibrous texture, no pink visible, no moisture in the tear
Step 7: Cool and Condition
Remove food from the oven and let it cool completely at room temperature. For fruits, consider “conditioning” by storing loosely in a jar for about a week, shaking daily. This redistributes any residual moisture evenly. Watch for condensation inside the jar—if you see it, return the fruit to the oven for more drying.
Specific Toaster Oven Dehydrating Ideas & Mini-Guides
Take advantage of apple season from September through November by choosing the best apples for dehydrating. Core apples and slice 1/8 inch thick using a mandoline for consistency. Optionally dust slices with cinnamon and a light sprinkle of sugar for a sweeter result. Dehydrate at 150°F (65°C) for roughly 3–4 hours, flipping slices hourly. Finished chips should be crispy and snap when bent.
Banana and Strawberry Slices
Slice bananas into coins and strawberries into 1/8–1/4 inch pieces. Pretreat banana slices in lemon water for 5 minutes to prevent browning. Dry together at 135–140°F (57–60°C) for 3–5 hours, checking for a leathery texture. These make excellent trail mix additions or standalone snacks.
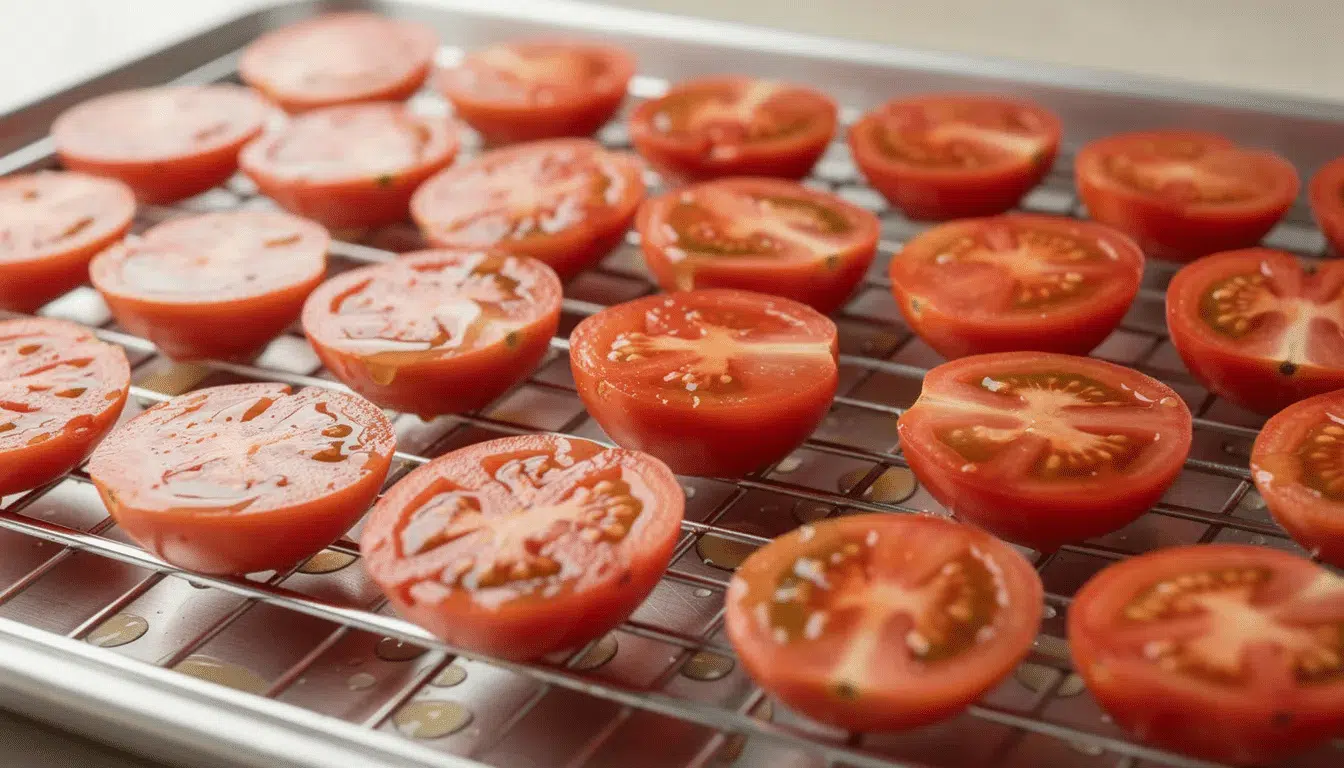
Tomato “Sun-Dried” Pieces
Peak tomato season runs July through September. Use Roma or cherry tomatoes for best results. Halve cherry tomatoes or slice Romas into 1/4-inch pieces. Optionally sprinkle with salt and dried herbs before drying. Set temperature to 150–160°F (65–70°C) and dry for 6–8 hours until chewy and concentrated. Store in olive oil for a classic sun-dried preparation.
Herb Drying (Basil, Parsley, Rosemary)
Summer garden herbs dry beautifully in a toaster oven. Keep temperatures closer to 95–120°F (35–50°C) if your oven allows—herbs are delicate. Check after 60–90 minutes and remove leaves as soon as they crumble between your fingers. Thicker herbs like rosemary take longer than delicate basil.
Simple Beef or Turkey Jerky
Start with lean meat strips marinated overnight in the fridge with soy sauce, salt, and your choice of seasonings. Preheat the toaster oven to 160°F (70°C) for the first hour to quickly move meat through the temperature danger zone for food safety. Then reduce to 145–150°F (63–65°C) until strips are dry and fibrous—usually 6–10 hours total depending on thickness. Refrigerate finished jerky for longer storage to keep it fresh.
Tips, Safety, and Storage for Toaster Oven Dehydration
These best practices help ensure safe, high-quality dried foods that last for months.
Temperature Control
Verify that your toaster oven stays below about 200°F (93°C) to avoid cooking food instead of drying it. The main working range for most foods is 120–160°F (50–70°C); understanding safe dehydration temperature guidelines for different foods helps you stay in the sweet spot. Use an oven thermometer—don’t trust the dial alone. Power fluctuations can affect temperature, so check periodically.
Even Drying
Keep slice thickness consistent within each batch. Avoid mixing very wet foods with delicate herbs in a single session. Don’t overcrowd racks; air needs to circulate around each piece. When you cut uniform pieces, they dry at the same rate.
Flavor Management
Strong-smelling items like garlic or onions can transfer flavor to mild fruits if dried simultaneously. Run separate batches to keep your apple chips from tasting like garlic chips. Clean your oven between batches if odors linger.
Food Safety Reminders
Wash hands thoroughly before handling food
Use clean cutting boards and tools
Handle raw meat separately from fruits and vegetables
Bring jerky to safe internal temperatures before the low-and-slow drying phase
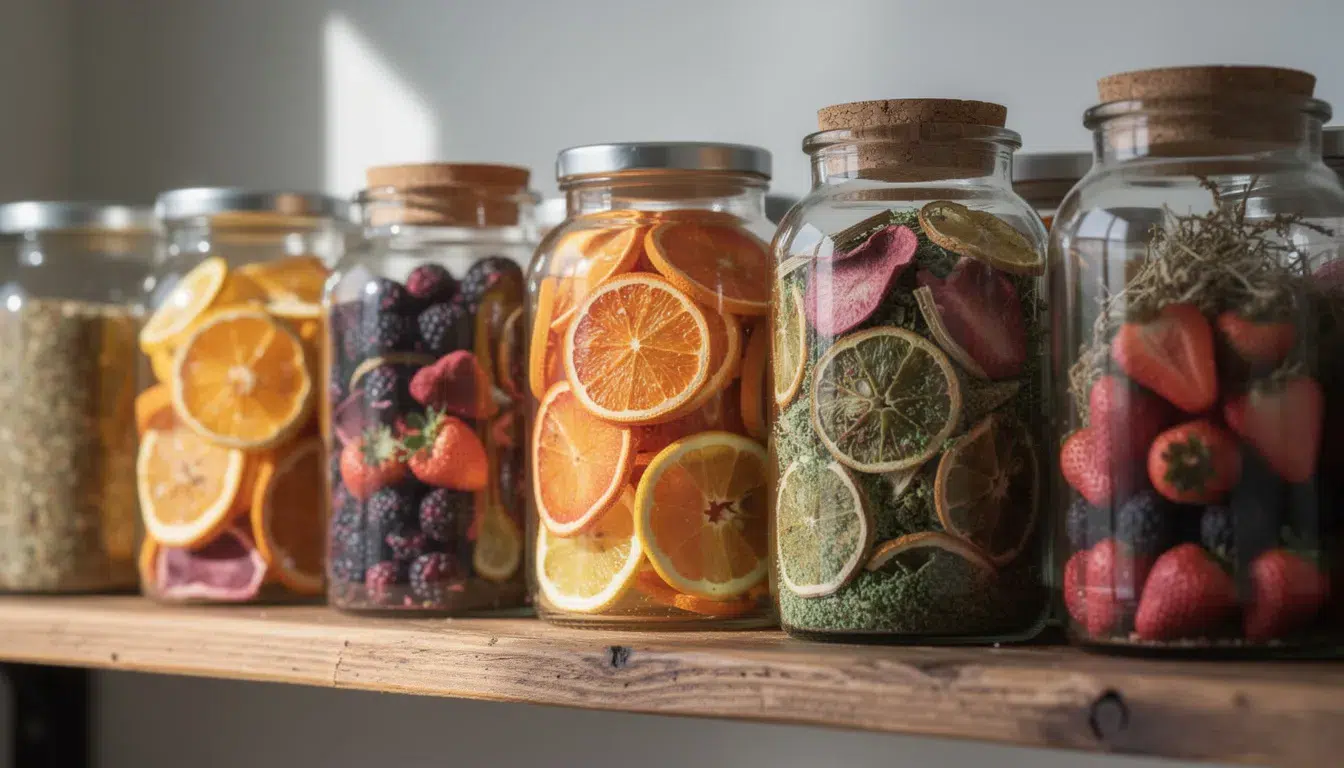
Storage Guidelines
Cool foods completely before storing—warm food creates condensation that leads to mold. Transfer to labeled airtight jars, vacuum-sealed bags, or snap-lid containers. Store in a cool, dark cupboard or pantry. For jerky or any foods with higher fat content, refrigerator or freezer storage extends shelf life significantly.
Expected Shelf Life
Food Type
Storage Method
Shelf Life
Herbs
Airtight jar, dark cupboard
6–12 months
Fruits
Airtight container, cool place
6–12 months
Vegetables
Vacuum sealed
6–12 months
Jerky
Refrigerated
1–2 months
Jerky
Frozen
4–6 months
Discard anything that shows mold, unusual color changes, or off smells. When in doubt, throw it out.
Start Small and Experiment
Before committing to large batches, experiment with small quantities to learn how your specific toaster oven performs. Every model is a bit different, and what works perfectly in one may need adjustments in another. A handful of apple slices or a few herb sprigs costs almost nothing if the first attempt doesn’t turn out perfect.
Your toaster oven is more versatile than its name suggests. With a bit of patience and these techniques, you can enjoy the benefits of dehydrating without adding another appliance to your kitchen. Start with something simple this weekend—maybe some cinnamon apple chips while you prepare dinner—and see what your trusty countertop oven can do.
DannyContent Writer
Hey there, since 2016, my mission has been to provide you with the information and guides you need to make food dehydrating simple and fun. Whether you're a newbie or a seasoned pro, my site offers helpful guides, reviews, and recipes to enhance your dehydrating experience. I take pride in only recommending products I believe in, ensuring my readers' trust. As an affiliate of various programs, including Amazon Associates, your support helps me continue providing quality content. Thanks for stopping by, and happy dehydrating!